
So I may be a little late with the March calendar of crafts/ science experiments, but I figured the 11th was good enough to get it out there. Most of my “crafts” are science experiments because my kids LOVE to tinker and explore. I also like my “fun things to do with the kids” to be educational and allow deep conversation to brew. Don’t get me wrong, there are times for the cute crafts, but I use them sparingly because there are so many amazing experiments out there with basic ingredients/ materials you have hanging around the house…so why not right!?! I have done some research on Pinterest and various teacher sites and have come up with a fantastic list sure to make your March fun and a HIT with your kids!
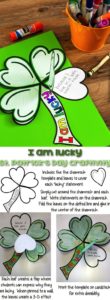
I love this “I am Lucky” St. Patrick’s Day craftivity because it helps children reflect on who they are as a person and helps them value what they have around them. So often, our kiddos don’t spend time thinking about what makes them a good person and appreciating the good things in their life. In this activity, students create a four-leaf clover. On each leaf, students write something that makes them lucky. You could also come at it from the perspective of something they’re thankful for or appreciate.
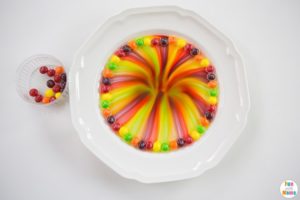
Skittles Rainbow Experiment
How fun is this Skittles Rainbow science experiment?!? So easy and will surely bring the “Oooh’s” and “Ahhh’s” from your kids or students. Place skittles (in a rainbow pattern) around a slightly sloped plate or bowl, add luke warm water until just the edge of the water touches the skittles, wait about 30 seconds and watch the magic happen!
Exploring Colors with Baking Soda and Vinegar
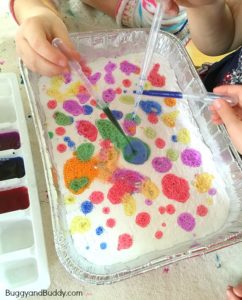
In this science activity, not only will children get to create a chemical reaction, but they’ll also be able to explore color mixing and create some colorful “artwork”!
Materials:
Tray to hold the materials
Baking Soda
White Vinegar
Food coloring
Ice cube trays
Pipettes
Procedure:
Place a fair amount of baking soda in the bottom of the tray.
Fill ice cube trays with the primary colors (food coloring) and vinegar
Using a Pipette, place different colored drops in the baking soda. Practice mixing the colors to make secondary colors.
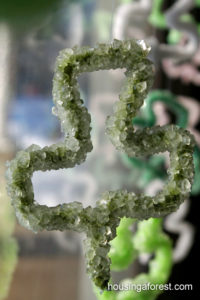
How to make Shamrock Crystals
- Borax
- boiling water
- a wide mouth glass mason jar
- green and white pipe cleaners
- string
- a pencil
- food coloring.
Instructions for making the crystals
First, twist your pipe cleaner into the desired shape. I set out a few templates of shamrocks (printed off the internet) for the kids to look at.
You will need 3 cups of boiling water per mason jar, 1/2 cup of Borax for each jar. The more saturated your solution is, the larger your crystals will be. Stir until all the borax is dissolved and the solution is clear, add food coloring if you desire.
Tie a string around the tail of the shamrock and tie the other end to a pencil. Gently lower the shamrock into the solution making sure that it is not touching any sides or the bottom. Set the jar in a safe spot that will not be disturbed. We let ours sit overnight and the kids were amazed to find the pipe cleaners were transformed into crystal-encrusted decorations. Gently cut off the string and display in your window.
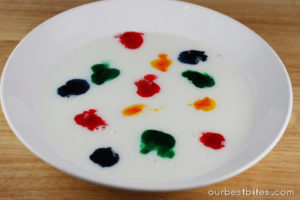
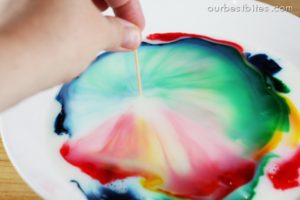
Magic Milk Experiment
Place milk in a shallow dish and add some drops of liquid food coloring.
Now grab a *magic* toothpick. What? You don’t know where to buy magic toothpicks?? Just dip the end in dish soap ?
and let your kiddo touch the milk with it.
The colors instantly shoot out at lightning speed creating a wake of rainbows! Try dipping the toothpick in the color first and then the milk and you’ll make rings.
Do it a few more times and then just sit back and watch. As the soap disrupts the surface tension of the milk, the colors dance around all by themselves. Kind of like a funky kaleidoscope.


1 Comment
Caroline Herron · March 11, 2017 at 12:42 pm
These experiments are too cool. I can’t wait to try some with my kids. Thank you for sharing!